Saturday, 12 June 2010

Tutorial- Diamond Pattern Card

You will need-

  • Bone folder
  • Scoring tool
  • Fiskars Cutter/ Ruler
  • Square card blank

DSC_0001

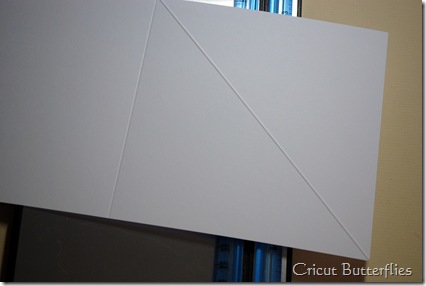
1. Emboss the square card from corner to corner using the bone folder first, then use the scoring tool along the same line and go across the card several times making sure the line is heavily indented. DSC_0006

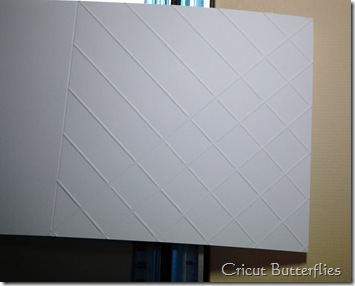
DSC_0011 2.Next line up your score line with the edge of the blue ruler and score again using the bone folder first and then the scoring tool.DSC_0013 3. Continue to line up the score line and emboss the next one until you have this.DSC_00174. Turn the card blank around and start to emboss the lines as before.DSC_0023

5. Continue until you have thisDSC_0026 6. Now emboss a line from corner to corner

DSC_0029 7. Once again emboss each line by lining up the previous line with the blue ruler until you have thisDSC_0033 8. Turn the card as before and continue scoring lines until you have thisDSC_0037Now your ready to embellish your card as you want. Below this post is a finished sample.

3d Robot and Robot Card

Here is a 3d robot and card I made using the Robotz Cricut Cartridge. The card is made using a cuttlebug embossing folder (Clockworks), which I just got the other week. The card blank was embossed in a diamond pattern (tutorial above this post). TFL

DSC_0003 DSC_0010DSC_0012

Flower Heart Card

Here is a card I made using design studio and the following cartridge-George and Basic Shapes, Jubilee, Paisley, Plantin Schoolbook and Tag, bags, boxes and more

If you would like the cut file for the heart please leave a comment on this post along with your email address.

DSC_0029

Nellie the Elephant

Here is a card I made using the Paisley Cricut Cartridge (Elephant) and straight from the nest (tree). The elephant on the paisley cartridge was altered using the hide contour button on design studio and then cut the envelope off. The card was textured using a sizzix texture plate.

DSC_0007 (3) DSC_0003

DSC_0004 (2)

If the shoe fits…

Here is a card I made using the Cricut Wedding Solutions Cartridge (Shoe) and Fabulous Finds (Book plate). The sentiment is from a clear stamp set by Papermania and is called retail therapy- shop till you drop. The background of the card was made using a sizzix texture plate on duo card and then sanding off the top layer of the raised areas.

DSC_0046

DSC_0047

Humming Bird Card

This card was made using Pagoda Cricut Cartridge. The background was embossed using a sizzix texture plate. The branches on the card were cut from brown card stock and then the flowers coloured with sakura star dust pens.

DSC_0039

DSC_0042

Sweet Birthday Wishes

Here is a card I made using the Sweet Treats Cricut Cartridge. The sentiment stamp is from an inkadinkado stamp set called Birthday Cupcake. The card is DL in size.

DSC_0014

Monkey card- Just swinging by to say…

Here is a card I made using a Whipper Snapper stamp (monkey) and a Stampendous clear set called Changito Dos (greeting). The cross hatching you see on the card is done using a fiskars cutter and embossing the lines by hand (I will be showing this in a future post).

DSC_0102

Owl Card

Here is another card made with the Paisley Cricut Cartridge. The stamps I used are by inkadinkado and were stamped with peeled paint distress ink, which I also used to ink the edges of the card.

DSC_0033

Sunday, 9 May 2010

Handbag Card

Here is a card I made using the Paisley Cricut Cartridge. I embossed the upper part of the handbag and used a white inkpad to pick up on the detail. I also used a sakura star dust pen to hand draw some stitching and then used a black soot distress ink pad to ink the edges of the card. The flower for the middle of the purse was cut from Accent essentials and then scored and layered. Thanks for looking!DSC_0011

Sunday, 25 April 2010

Hedgehog Card

I made this cut using design studio and two cricut cartridge: Opposites Attract and George and Basic Shapes. If you would like the cut file for this card please leave a comment on this post and include your email address and I will send you the cut file. The background of the card was made using patterned tissue paper which I screwed up and tore and then inked with a Tim Holtz distress ink pad. TFL

DSC_0002

Russian Nesting (Matryoshka) Doll Card

I would like to thank Pink Stamper for featuring my castle on her blog the other week! I would also like to welcome all my new followers and those who have commented on my posts.

On to today's card which I made using Paisley and the Easter Mini Cricut Cartridge. The dolls are cut from Paisley and the boarders either side were done with the Easter Mini. The greeting is from a clear stamp set by Hero Arts. Thanks for looking!

DSC_0014

DSC_0015

Monday, 29 March 2010

Easter Bunny Card

The card below was made using Everyday Paper Dolls (Bunny), Plantin School Book (Flowers and Grass) and Doodlecharms (Egg). I used chalk and white pencil to accent the Bunny. The grass was cut in white and then inked with inky brushes in green and the flowers coloured with sakura stardust pens. Also the background was embossed with a Sizzix texture plate. TFL

DSC_0057 (2)

Easel Card

Here is a card I made the other day using the Wild Card Cartridge and a Forever Friends Stamp. This card was created in Design Studio, if you would like the cut file please leave a comment with your email address and I will send the cut file to you. TFL.

DSC_0049

DSC_0047

DSC_0052

DSC_0053

Saturday, 20 March 2010

Once Upon A Princess Castle

Here is the castle I made today using the Once Upon A Princess Cricut Cartridge. On my castle I also used the Jubilee Cricut Cartridge to cut a banner which I cut in half and wrapped around a cocktail stick to make a flag. All the castle components were cut at 7 inch and my castle was made completely out of A4 card stock of which I used 7 sheets (3 sheets of light pink, 3 sheets of dark pink and 1 sheet of brown). I also made a slight modification to my castle using design studio, with which I used the main front of the castle (the one with a drawbridge) and hid the contours so that all that was cut was the drawbridge itself. This enabled me to then emboss my drawbridge with a wood effect fiskars embossing plate and then I inked this with a lighter brown to bring the patternation out. From the base of the castle to the top of the tallest turret (with out flag) the castle measures just over 8 1/2 inches tall. Thanks for looking :)

DSC_0002

DSC_0013

Monday, 15 March 2010

Sheep Card

Here is a card I made using the Easter mini and Story Book Cartridge. The cut file was from a custom crops project which can be found here. On my card I used glossy accents on the nose and stuck on some clear crafty notions rainbow drops for eyes.  The white part of sheep is embossed with D'Vine Swirl cuttlebug folder. I also used Old Paper distress ink to ink the grey parts of the sheep.

DSC_0042DSC_0043

Sunday, 14 March 2010

Happy Birthday Cards for my Mum

Today as well as it being Mother’s Day is also my Mum’s Birthday so I thought I would share with you the cards I made her. The first card is the one I gave my Mum. It is made using A Child’s Year Cartridge for the fairy. The wings of the fairy have been glittered using a fine glue nib and some crystal glitter. The Happy Birthday was stamped using versa mark and then a chocolate embossing powder that actually smells of chocolate. YUM! The background shape that fills the card was cut using the Story Book Cartridge.

DSC_0004

DSC_0009

DSC_0010

Here is the second card I made, which I used the Love Struck Mini cartridge. I cut the heart out of Ice White paper (A shinny white) and then inked it using my Inky brushes (these look like shaving brushes). TFL.

DSC_0028

Happy Mother’s Day

Here is the card I made for my Mum using the Mother’s Day Mini Cartridge. Here is a picture:

DSC_0017

TFL.

Saturday, 13 March 2010

A little Bird told me…

Here is a card I made a while back, but as of yet had not had chance to post so here it is. The card is made using the Home Decor and Hello Kitty Font. The outside reads A little bird told me … and the inside says Its your Birthday. Thanks for looking!

DSC_0104

Tuesday, 9 March 2010

Cupcake Card and Gift

Today I thought I would post a card and gift I made the other day with a cupcake theme. The card was made using the Home Decor Cricut Cartridge. Here is a photo:

DSC_0008 (3) Here is a close-up of the cherry, which I coated with Glossy Accents.

DSC_0013 (3)

I also created a gift using the Easter mini Cartridge. To make it you cut a cupcake wrapper and then roll a pair of socks up and add a pompom for a cherry. I scrap lifted this idea from Greenbean on the cricut message board. To view their original post please click here.

DSC_0006 (3)

Thanks for looking!